Intro to snap zones
Updated on
March 21, 2023
In this VR Builder tutorial, you will learn how to make users pick up an object and place it in a predefined position by using snap zones.
- Setting up the scene in Unity
- Defining the process in the process editor
- Making the object grabbable in VR
- Placing the object in a specific position in VR
- Next Steps

Setting Up the Scene in Unity
Before you start with this tutorial, you need to set up the scene using VR Builder. If you need additional help, please refer to the tutorial about setting up the Unity project with VR Builder. This Unity scene contains a floor, a simple table, and a blue brick.

Please note that I used a more complex geometry for the main object (blue brick) to illustrate the powerful capabilities of the snapzone. I also added a Rigidbody and a Box Collider to it. The Rigidbody is kinematic, so the brick doesn't react to physics and therefore won't fall to the ground when I let go of it.

If you do not add these components (Rigidbody and Box Collider) to the model, they will be added automatically later since they are required for VR interactions. If things behave differently than expected, check the object's Collider and Rigidbody components.
Defining the Process in the Process Editor
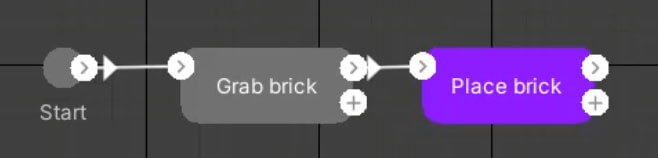
After you set up your Unity scene, it is time to define the workflow of our VR application in Unity, i.e. the individual steps that the user must go through in VR. As a first step, we want the user to pick up an object. In our case, this object is a blue brick. In the second and last step, we want the user to place the object in a predefined position. The final result looks like this:
In case you need additional help for setting up this workflow, please refer to the tutorial on the VR Builder GUI.
Making the Object Grabbable in VR
In the first step, we want the user to pick up the blue brick. For this we need the Grab Object interaction. To add this interaction, select the first step in the Process Editor, then go to Transitions in the Step Inspector tab and choose Add Condition > Interaction > Grab Object.

To apply the interaction to the blue brick, we must reference the game object. You can do so by drag'n'dropping the blue brick object from the scene hierarchy to the Object field. Alternatively you can do so directly in the Step Inspector by using the object selector next to the Object field. Then press the Fix it button to add the necessary components to the referenced object. This makes it possible to interact with it in VR. In this particular case, the Grabbable Property and its dependencies are added.

You can check the added scripts by selecting the object and switching to the Inspector tab.

If you would now run the app in Unity, it would already be possible to interact with the blue brick in VR.
Placing the Object in a Predefined Position in VR
Placing Virtual Objects
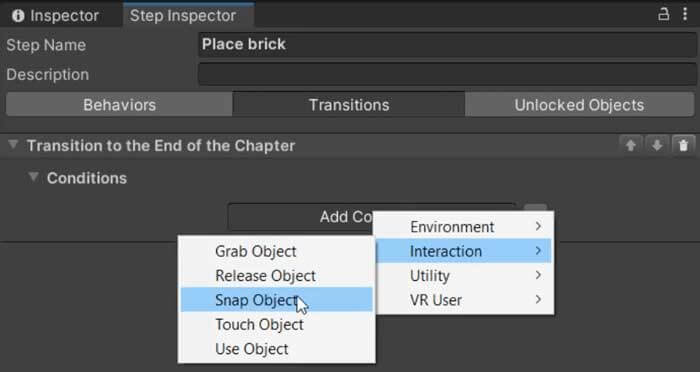
In the second step, we want the user to place the blue brick in a predefined position. This requires making the brick snappable and creating the snapzone that specifies the end target position. To make the blue brick snappable, we need a Snappable Property. The Snappable Property is added automatically when we create a Snap Object interaction. Therefore, go to Transitions in the Inspector tab and select Add Condition > Interaction > Snap Object.
To apply the interaction to the blue brick, reference it as before. Then press the Fix it button again to add the necessary components to the referenced object. In this particular case, the Snappable Property and its dependencies are added, so you can interact with the blue brick in VR.
Creating Snap Zones in Unity
To make the snap zone for the blue brick, we first need to create a ghosting object of the blue brick - a new object with the same geometry as its reference object. The snap zone will be activated as soon as the user enters this particular step and becomes visible immediately to show to the user where the blue brick should be placed. When the correct object enters the snap zone, it highlights in green. When the object is then released, it snaps to the target position.
You can of course modify the settings of the snap zones, as well. For further guidance on how to change the snap zone's settings, please access the tutorial on customizing snap zones.
On the Inspector tab, we see that the blue brick now has the Snappable Property we have just created before. This property has a Create Snap Zone button. When you click this button, a new object, the Blue Brick_SnapZone, is created. This Blue Brick_SnapZone has a ghosting object as a visual representation and uses the same geometry as the blue brick. It represents the snap zone - the position where the blue brick should be placed.

Finally, to define the target position of the brick, reference the Blue Brick_Snap Zone as the Zone to snap into.

Now when the brick enters the snap zone, the ghosting highlight turns green. As soon as the VR user releases the brick it snaps into the predefined position.
Next steps
In this VR Builder tutorial you have learned how to pick up and place objects in a predefined position in VR by using snap zones. But what if you want to customize snap zones to suit your personal needs? Check out our tutorial on customizing and interacting with snap zones!