States & Data - How to create a color mixing machine
Updated on
February 16, 2026
Note: The add-on provides comprehensive documentation as well. You can find it in Unity in path: MindPort → VR Builder → Add-ons → StatesAndData → Documentation
In this VR Builder tutorial we will learn how to use the features of the States & Data add-on for VR Builder. In doing so, we will create a color mixing machine in VR. The user can put different colored bottles into the mixer, which creates a combination of colors and ejects a ball according to the mixture.
After following the tutorial, you will have a good understanding of the States & Data add-on features to enhance your own VR content in Unity. In doing so, we will cover:
- Setting up the Unity scene
- Storing the color with number data properties
- Creating state data properties to read and set enum states
- Starting the mixer
- Mixing colors
- Changing the mixer light according to the color mix
- Defining and activating states of the mixer
- Resetting the mixer
- Ideas for improving the user experience in VR
- Next steps
Setting up the Unity scene in VR
This Unity scene has been assembled with Unity primitives and consists of a mixer and a table with different colored bottles.
You can download the exact same scene here, or create your own scene and process. In our scene, all static scene elements are grouped under the Environment game object. All objects needed for building the process are on the root of the Hierarchy for convenience.

Now we want to create a color mixing machine in VR with the following process:
- The user can mix primary colors together by placing bottles into the mixer’s hatch
- The mixer stores the color mixture in data properties
- The color of the light on the mixer corresponds to the color mixture that is inside the mixer
- The user can press the green button on the mixer to start it
- After a short animation, the mixer will eject a ball with the mixed color
Storing the color with number data properties
Before we start designing the process of our VR application, we need to determine how to store the colors we create. Computers use the additive system to store colors. So the primary colors are red, green, and blue. Now we need to store a value for each of these primary colors in such a way that it can be recorded by VR Builder.
We can store the three values in Number Data Properties. Data properties are a type of VR Builder property that stores a value and can be interacted with from the process graph. This allows us to change them later in the process and read them in our code. We recommend creating a separate game object for each data property to make it easier to use and reference them.
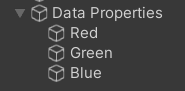
In the first step, create three empty game objects named Red, Green, and Blue. Then group these game objects under another empty object to keep the hierarchy clean, and name it Data Properties.
Then, add a Number data property component to each of these game objects. This data property stores a single number with floating point precision. However, for our purpose, we will use them as integers.
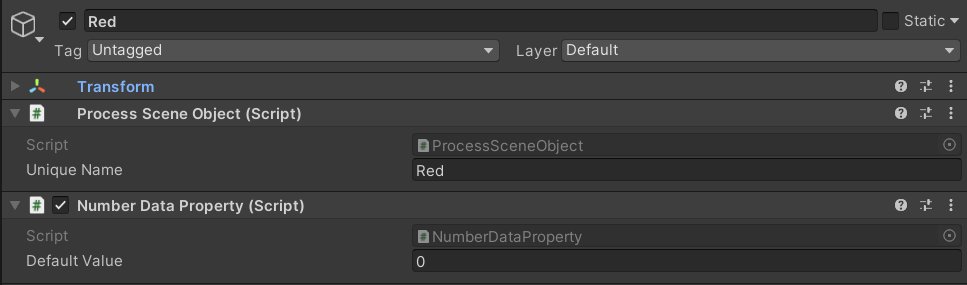
At the same time, a Process Scene Object component is automatically added to the game object so that it can be referenced in the Step Inspector.
We want each vial to add a good amount of color to the mixture. For this purpose, each color will have just a few intensity levels - let's say we create eight intensity levels (0 to 7). Each color bottle changes the intensity of the corresponding colors by one level. This means that, for example, eight bottles of yellow are needed to change from white to pure yellow.
Since we are saving the color in RGB format and we want the starting color to be white, each of these properties must be set to the maximum value - we can do this by editing the Default Value field. Since we decided that our values (color intensity levels) should vary between 0 and 7, set the default value for all properties to 7.

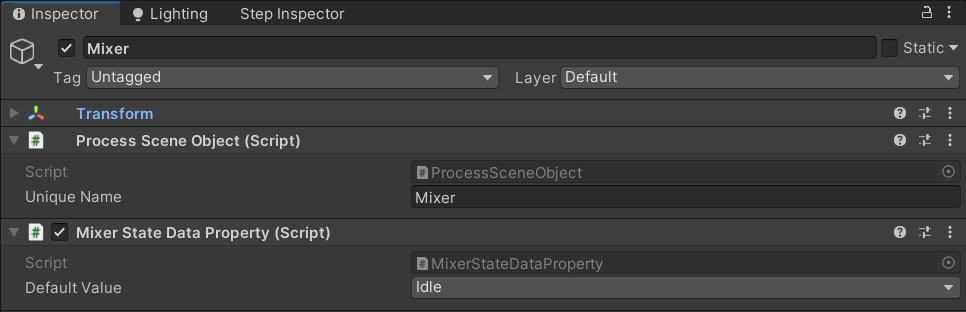
Creating state data properties to read and set enum states
The mixer is managed with a state data property, which allows us to read and set enum states from VR Builder and control the behavior of the mixer with custom code.
To use state data properties with VR Builder, we need to define a custom enum in code. Therefore, create a C# script called MixerState, delete everything, and replace it with the following custom code:
public enum MixerState
{
Idle,
Processing,
Finished,
}
This creates an enum with the three states we need for the mixer: Idle, Processing, and Finished.
Then we need to create a data property that contains that state. This can be done by overriding a template class. Create another script and name it MixerStateDataProperty. Replace this script with the following code:
using VRBuilder.StatesAndData.Properties;
public class MixerStateDataProperty : StateDataProperty<MixerState>
{
}
We will store the logic for the mixer in the Mixer game object. Therefore, add the newly created data property there.
Starting the mixer in VR
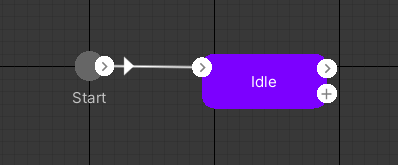
Now we can start working on the process in the VR Builder Process Editor. In the first step, the mixer is idle and the user can add color bottles to create his mixture or press the button to start the mixer. Therefore, create an empty step and call it Idle.
We want the user to throw the color bottle into the mixer. This requires us to check if the bottle is in the collider inside the mixer.
Therefore we add a Move Object in Collider condition. Then select a bottle as Object and the ColorCollider of the mixer as Collider.
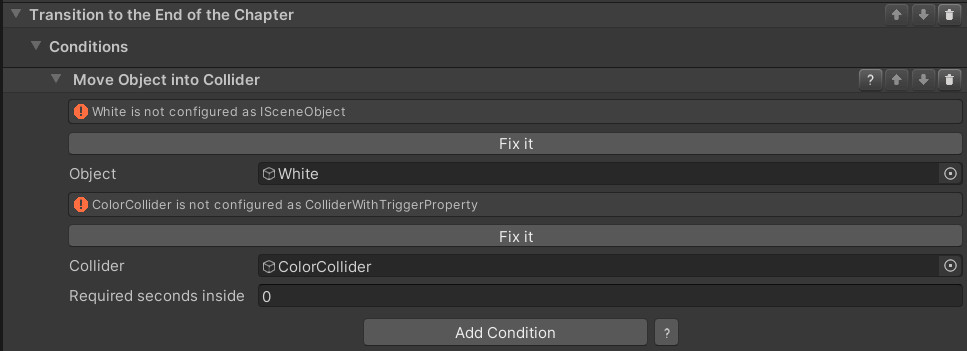
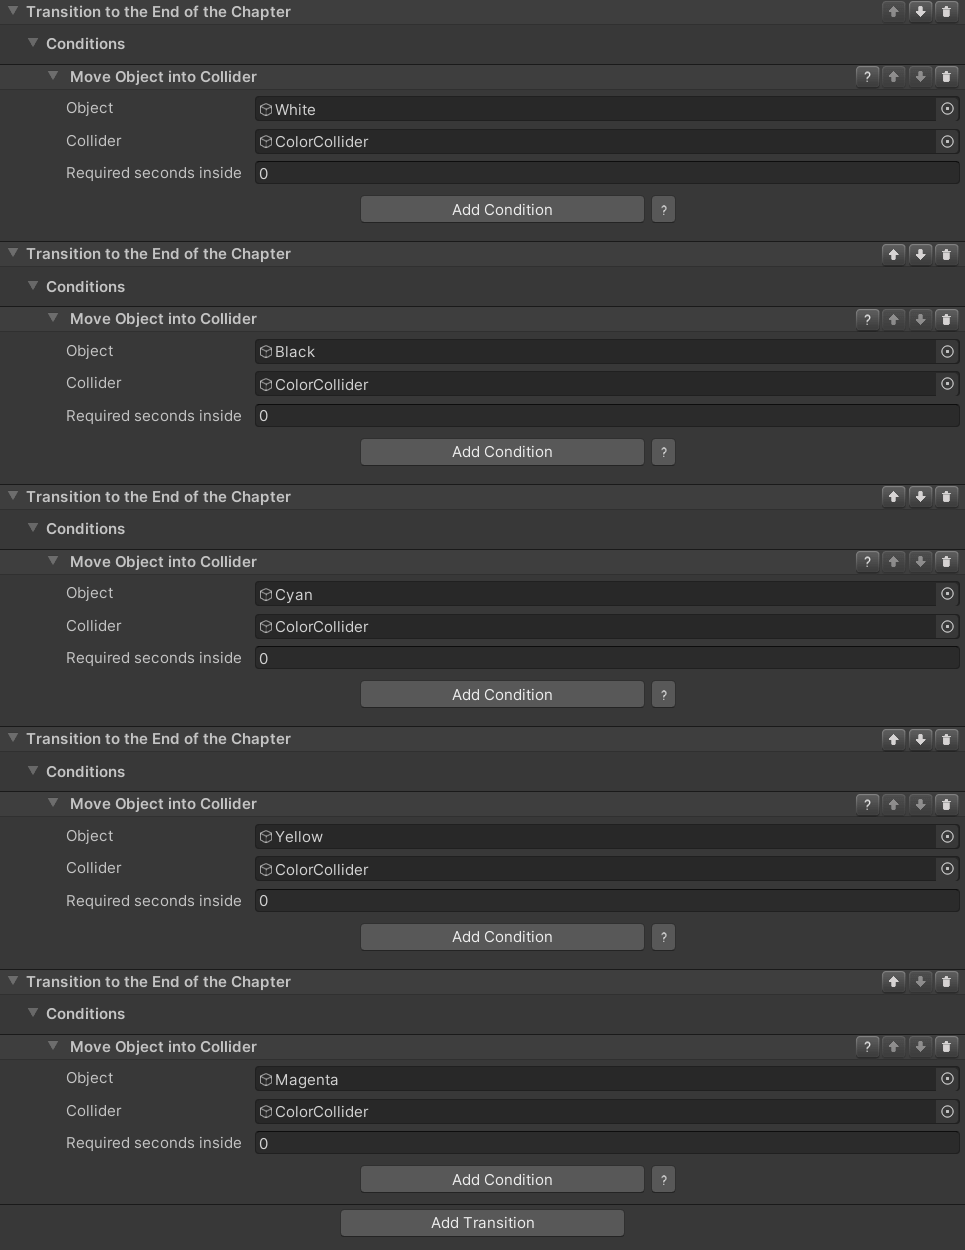
Then press the Fix it button to automatically add the required properties. Next, add four new transitions and repeat the process for each color bottle.
Now only one last condition is missing to start the machine. Therefore, we use a Touch Object condition and select the Button game object, which is a child of the mixer, as the object to be touched.

We’re almost done with this step, but we need to take care of one last thing. Due to the restrictive environment feature of VR Builder, only the properties referenced in the step are activated. We know that the Move in Collider condition only checks if the object is in the collider. The object doesn’t become grabbable automatically, which is why we have to make it grabbable manually. However, the grabbable property of the bottles is not unlocked because there is no grab object condition visible. Therefore, the bottles cannot be grabbed in this step.
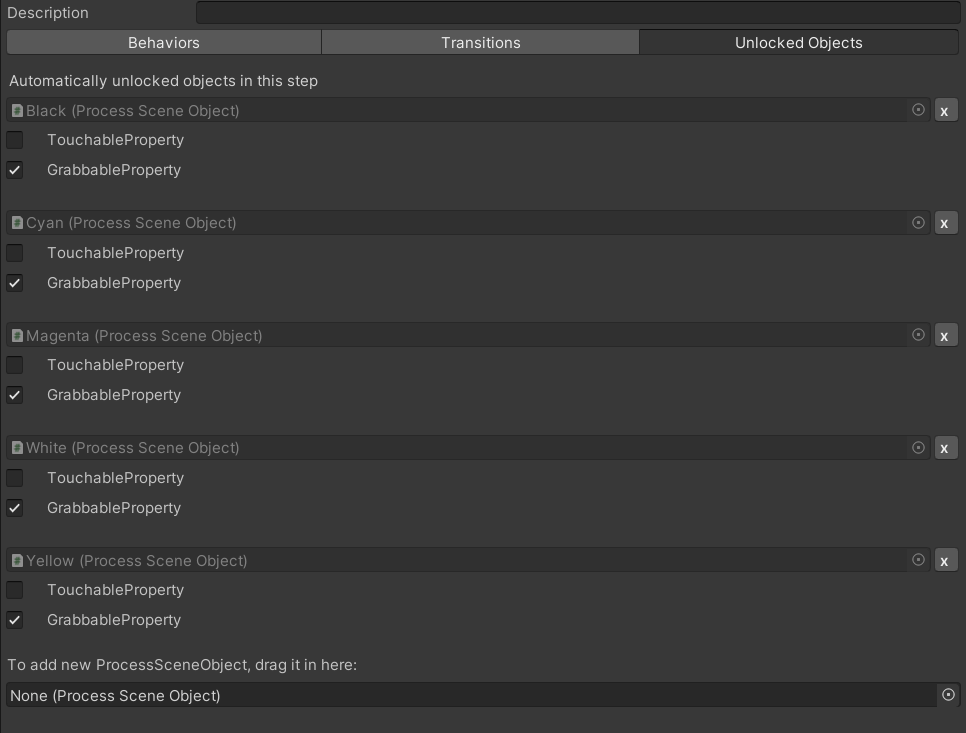
We can solve this issue by manually unlocking the Grabbable property for the bottles. To unlock the Grabbable properties, open the third tab Unlocked Objects in the Step Inspector. Then add each bottle to the list by dragging them to the Unlocked Objects tab. Finally, check the GrabbableProperty entry to unlock them.
Now you can grab the colored bottles in VR and place them into the hatch of the mixer.
Mixing colors in VR
Now we will mix the colors. For this we need to define the steps that change the color in the mixer.
Let's start with adding white color to the mixer. Therefore, add a step, connect it to the first condition of the previous step Idle and rename it to Add white. This step should also execute some behaviors and then loop back to the Idle step to allow us to add more colors or start the mixer.

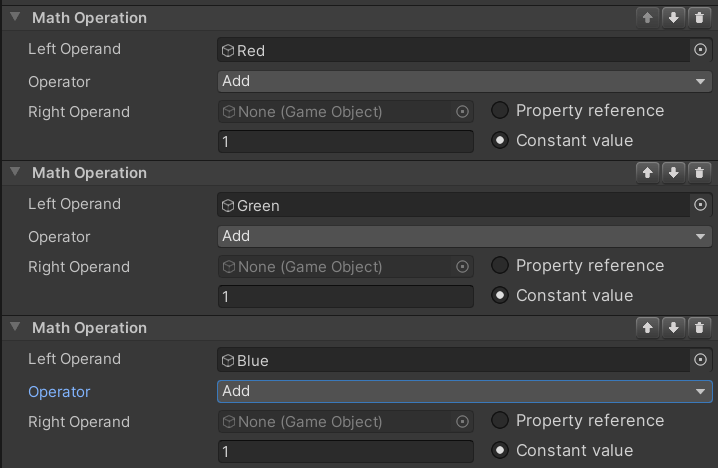
We want the mixer to automatically add the white color of the bottle to the existing color mix in the mixer. This requires modifying the stored color values to reflect the change in white color. In other words, all three R, G, and B values should be increased by 1.
To do so, we need the Mathematical Operation behavior. This behavior changes the value of a number property by performing an operation on it.
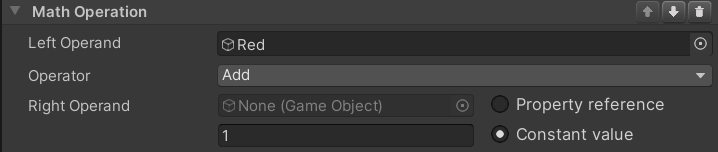
Next, select one of the data property objects (Red, Green or Blue) as the left operand, change the operator to Add and insert the constant value 1. Note that it is possible to use another Number data property as the second operand if needed. Repeat this process for the other colors as well.
Since we only have one bottle per color, we want it to automatically return to the shelf - its spawn point - after use so it can be reused. This requires the Move Object behavior. In the case of the white bottle, this will be the game object WhiteSpawnPoint.

Repeat the same process for the other color bottles. The concept is the same, the only difference is the change in colors:
- For black, subtract 1 from all three properties of red, green, and blue.
- For cyan, you subtract 1 from red.
- For yellow, subtract 1 from blue.
- For magenta, subtract 1 from green.
This may seem confusing at first - we store colors in the additive RGB color system, which is useful on computers. However, we mix colors in the subtractive CMYK color system - the common method for mixing colors in paint or print.
A detailed explanation on additive and subtractive colors is beyond the scope of this tutorial. If you are interested in this topic, you can find more information in this Color Theory article.
After following the instructions above, your process should look like this:

If you press play now, you should be able to put bottles into the mixer. However, we don't know what the color mix looks like because the top light doesn't change yet according to the color mix in the mixer.
Adjusting the mixer light according to the color mix
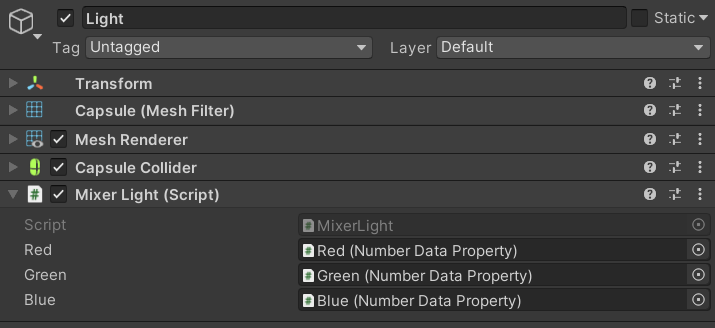
Now we want the color of the light on the mixer to match the current color mix inside the mixer - this requires adding a custom script to the light.
Therefore, create a script called MixerLight and paste this code:
using System;
using UnityEngine;
using VRBuilder.Core.Properties;
public class MixerLight : MonoBehaviour
{
[SerializeField]
private NumberDataProperty red, green, blue;
private MeshRenderer meshRenderer;
// The maximum intensity value a single color can have. "7" means each color will have 8 shades (0-7). Not many, but we want each bottle to make a visible difference when added to the mix.
private const int maximumIntensity = 7;
private void Start()
{
meshRenderer = GetComponent<MeshRenderer>();
// Register ValueChanged on all properties.
red.ValueChanged += OnValueChanged;
green.ValueChanged += OnValueChanged;
blue.ValueChanged += OnValueChanged;
}
private void OnValueChanged(object sender, EventArgs e)
{
// Since the value of a property has changed, update the color of the light.
meshRenderer.material.color = ColorFromDataProperties();
}
// Convert from our data property values to a 32 bit color. We are making this function public so we can access it from elsewhere.
public Color ColorFromDataProperties()
{
return new Color(red.GetValue() / maximumIntensity, green.GetValue() / maximumIntensity, blue.GetValue() / maximumIntensity);
}
}
This script registers to the ValueChanged event each data property has. So, when the event is triggered because of a change in value in one of the data properties, it will update the color of the light’s material accordingly.
We can now add a MixerLight component to the mixer light object and drag the data properties into the appropriate fields.
If you press play now, you should be able to put bottles into the mixer. The light changes according to the color mix.
Defining and activating states of the mixer
The next step is to activate the mixer. Instead of adding detailed logic for this in VR Builder, we will simply change the state of the mixer and write some code that handles state changes.
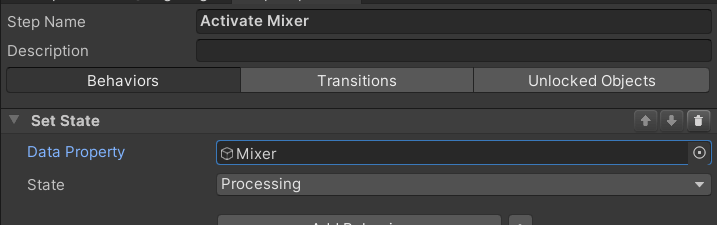
Therefore, create a new step and rename it Activate Mixer. Then connect it to the transition with the Touch button condition we created previously
To change state from the Process Editor, we need a Set State behavior: States and Data > Set State. Reference the Mixer. Afterwards, a State drop-down menu appears - select Processing.
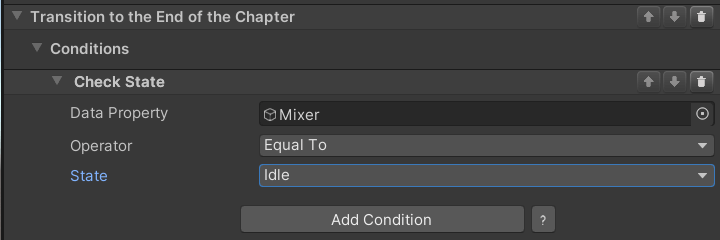
This step is active only as long as the mixer is in operation. As soon as the mixer enters the Processing state, it completes its task and then enters the Finished state. When the Finished state is triggered, a ball is produced, the hatch is opened again, and the mixer transitions back to the Idle state.
To transition to a new step when an object reaches a certain state, we need the Check State condition: States and Data > Check State. Then reference the Mixer, select Equal To for the Operator, and Idle for the State.
Additionally we create this ColorMixer script, which will handle the state changes in the mixer, executing custom logic when VR Builder changes the state.
using System;
using System.Collections;
using UnityEngine;
using VRBuilder.XRInteraction;
public class ColorMixer : MonoBehaviour
{
[SerializeField]
private Transform hatch, ballSpawnPoint;
[SerializeField]
private MeshRenderer button;
[SerializeField]
private MixerLight mixerLight;
private MixerStateDataProperty dataProperty;
private void Start()
{
dataProperty = GetComponent<MixerStateDataProperty>();
// Register to data property event to know when state is changed through VR Builder.
dataProperty.ValueChanged += OnStateChanged;
}
private void OnStateChanged(object sender, EventArgs e)
{
// Check which is the current state and call the relevant method.
switch (dataProperty.GetState())
{
case MixerState.Processing:
StartCoroutine(HandleProcessingState());
break;
case MixerState.Finished:
StartCoroutine(HandleFinishedState());
break;
}
}
private IEnumerator HandleProcessingState()
{
// The button turns to red while the machine is running.
button.material.color = Color.red;
// Hatch closing animation.
float elapsedTime = 0;
Quaternion startRotation = hatch.transform.localRotation;
while (elapsedTime <= 1)
{
elapsedTime += Time.deltaTime;
hatch.transform.localRotation = Quaternion.Lerp(startRotation, Quaternion.identity, elapsedTime);
yield return null;
}
hatch.transform.rotation = Quaternion.identity;
yield return new WaitForSeconds(2f);
// Set a new state in the data property.
dataProperty.SetState(MixerState.Finished);
}
private IEnumerator HandleFinishedState()
{
// The button returns green once the machine is done.
button.material.color = Color.green;
// Hatch opening animation.
float elapsedTime = 0;
Quaternion startRotation = hatch.transform.localRotation;
while (elapsedTime <= 1)
{
elapsedTime += Time.deltaTime;
hatch.transform.localRotation = Quaternion.Lerp(startRotation, Quaternion.Euler(-30, 0, 0), elapsedTime);
yield return null;
}
hatch.transform.rotation = Quaternion.Euler(-30, 0, 0);
// Spawn a sphere, and make it the selected color.
GameObject sphere = GameObject.CreatePrimitive(PrimitiveType.Sphere);
sphere.transform.localScale = Vector3.one * 0.2f;
sphere.GetComponent<MeshRenderer>().material.color = mixerLight.ColorFromDataProperties();
sphere.transform.position = ballSpawnPoint.position;
// Make the sphere a generic grabbable object, not related to the VR Builder process.
sphere.AddComponent<InteractableObject>();
// Set a new state in the data property.
dataProperty.SetState(MixerState.Idle);
}
}
Now we can add the component to the Mixer game object and drag the necessary references into the Inspector.
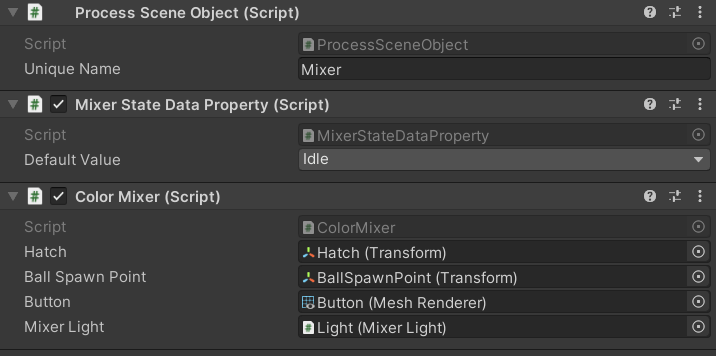
In the color mixer script reference
- Hatch to animate the mixer
- Empty game object BallSpawnPoint as the transformer to create the colored ball.
- Button as a mesh renderer to change its color while the machine is running.
- Mixer Light component, as it contains the function that converts the data properties to a color. Although there may be better places to add this function, it works for our purpose and simplifies the flow of the tutorial.
Now you should be able to interact with the mixer in virtual reality!
Resetting the mixer
Although it is now possible to interact with the mixer in VR, the selected color remains after use. What we want to do, however, is to reset the data properties to their default value so the mixer can be used again.
It is possible to reset a data property in code, by calling the ResetValue() method, or with a behavior, which is what we are going to do.
To do this, add another step after the Activate Mixer step and rename it to Reset Color.
Select the Idle step and add three Reset Value behaviors to reset the three color data properties: States and Data > Reset Value. Reference each game object (Red, Green and Blue) for every Reset Value behavior.
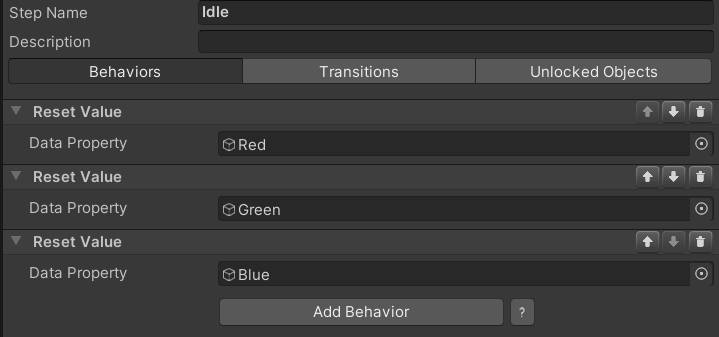
This will reset the values for the color data properties to the default values we set at the very beginning of this tutorial, and the light will turn white again.
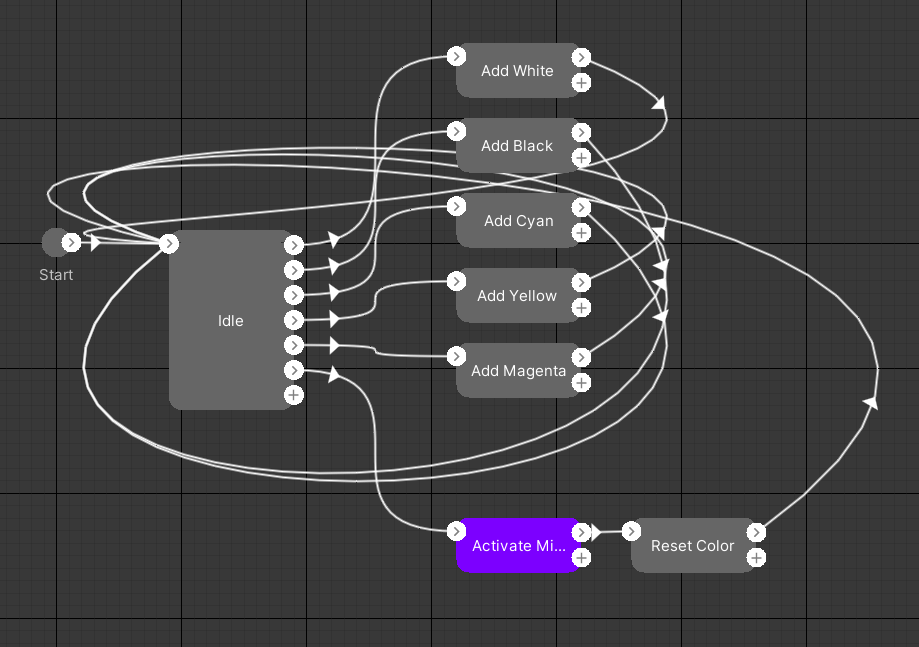
Now simply loop back this step to the Idle step and the mixer will reset after use. The final workflow in VR looks like this:
Ideas for improving the user experience in VR with States & Data
Clamping color values
For the sake of simplicity, we did not bother clamping a data property’s value between 0 and 7. However, it would be better if the data properties could not exceed or fall below the specified range. It is possible to clamp a data property's value in code or directly in VR Builder.
To do so in VR Builder, we can add a Min or Max operation to ensure that the value does not exceed the range after increasing or decreasing a value. For example, after increasing a data property, we can add a Min operation between its value and 7. This sets the value to the lowest between the two and ensures that it never exceeds 7.
Next steps
In this VR Builder tutorial, you learned how to create a color mixing machine in VR using the States & Data add-on. Now it's your turn to create your own VR application with the States & Data features. If you haven't already, download the States & Data add-on!